If you’re reported overdue on a hike, your parked vehicle may become an important clue. Finding it can help police confirm where you likely started, but the vehicle itself doesn’t tell them where you went from there. That’s why, as well as leaving your trip intentions with someone you trust, it can be useful to leave a second copy of your map and hike plan out of sight inside your vehicle. If police locate and access the vehicle during a search, that information may provide a clear record of your intended route, planned campsites, direction of travel and expected return time.
It’s a simple backup that could help reduce uncertainty when time matters.
Why Your Vehicle Matters
For many hikes, particularly overnight and multi-day trips, the trailhead is the last place where your movements can be established with reasonable confidence. If your vehicle is still parked there after you’ve been reported overdue, it can help confirm that you probably started the hike from that location and have not yet returned to collect it. That is useful information, but it still leaves a much bigger question: where did you go?
A trailhead might provide access to several tracks, side routes, campsites or off-track areas. Even if police know which hike you intended to complete, they may not immediately know which direction you travelled, whether you planned any side trips, where you expected to camp or whether you intended to return by the same route. A copy of your actual plan inside the vehicle can help answer some of those questions.
Leave a Copy of Your Map and Plan in the Vehicle
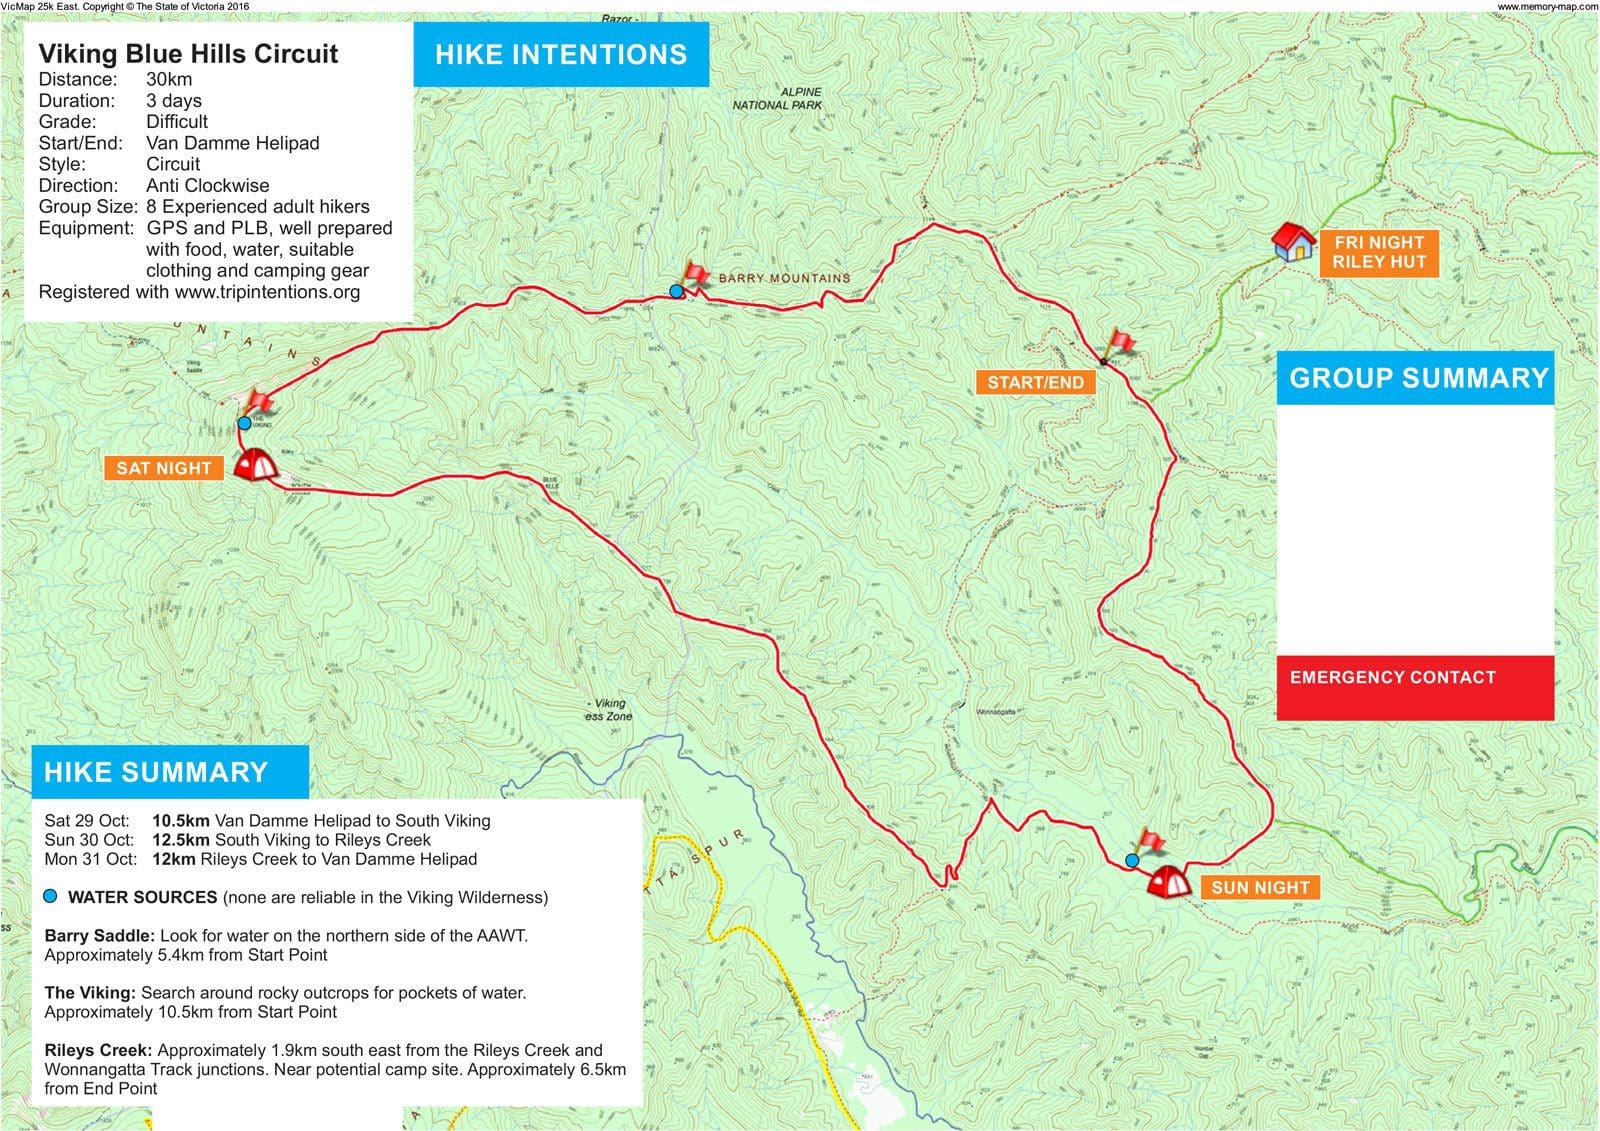
Before setting off, place a copy of your hike plan and route map somewhere out of sight inside your vehicle, such as the glove box. The plan doesn’t need to contain every detail of your preparation. Its purpose is to give rescuers useful information about where you intended to be.
Include:
- the name of the hike or route
- your planned start and finish points
- the direction you intended to travel
- your expected route, marked clearly on a map
- planned campsites or overnight stops
- any intended side trips, alternate routes or exit points
- your start date and expected return date and time
- the names of the people in your hiking group
- details of any PLB or satellite communication device you’re carrying
- the name and phone number of your emergency contact
For longer or more complex trips, it can also be useful to mark important water sources, major junctions and other locations that might help someone understand your intended movements.
Keep the Plan Out of Sight
Don’t leave the plan visible on the dashboard, windscreen or passenger seat. A document showing that you’re away on an overnight or multi-day hike can also advertise that the vehicle may remain unattended for some time. Keep it somewhere discreet but reasonably easy to locate if police need to examine the vehicle, such as inside the glove box or centre console.
The intention isn’t to create a notice for anyone walking past. It’s to leave useful information behind if your vehicle later becomes part of a search.
Your Emergency Contact Should Have Your Vehicle Details Too
The information needs to work in both directions. While a copy of your hike plan should be left in the vehicle, your emergency contact should also know what vehicle you’ve taken and where you intended to leave it. Include the make, model, colour and registration number, along with the trailhead or parking location, in the trip intentions you leave with them.
If you’re reported overdue, those details can help police locate the vehicle and confirm whether it is still at your planned starting point. The information inside the vehicle can then add another layer by showing where you intended to go after leaving it.
It’s a Backup, Not Your Primary Safety Plan
Leaving information in your vehicle does not replace leaving trip intentions with a trusted person. A plan sitting in a glove box cannot notice that you’re overdue and cannot call for help. Someone still needs to know where you’re going, when you expect to return and when they should contact police if you fail to check in.
Think of the vehicle copy as redundancy. Your emergency contact provides the trigger that starts the response. Your vehicle can help establish your starting point. The map and plan inside it can provide another record of where you intended to go. If your route changes before you set off, update both copies. If you change your plans while hiking and have a way to contact your emergency contact, let them know.
Final thoughts
Most hikers already understand the value of telling someone where they’re going. Leaving a second copy of that information in your vehicle is an easy additional step. If you’re overdue and your vehicle is found at the trailhead, it shouldn’t have to remain just a clue that says, “they started somewhere around here.” A map and plan inside it can provide much more useful information about where you intended to travel and where rescuers might begin looking. Leave your detailed trip intentions with someone you trust, but leave a copy behind in the car as well.